We are kicking off our new series on how to write a Japanese resume (or rirekisho), with this article on how to fill out the Personal Information section.
Coming at the very top, the Personal Information section is the very first field of the rirekisho that you will fill out. It is also the very first place recruiters look when reviewing your resume.
There are some formatting rules and cultural issues to be aware of, so read this guide to make sure you follow them correctly.
Difficulty Rating ★★☆☆☆
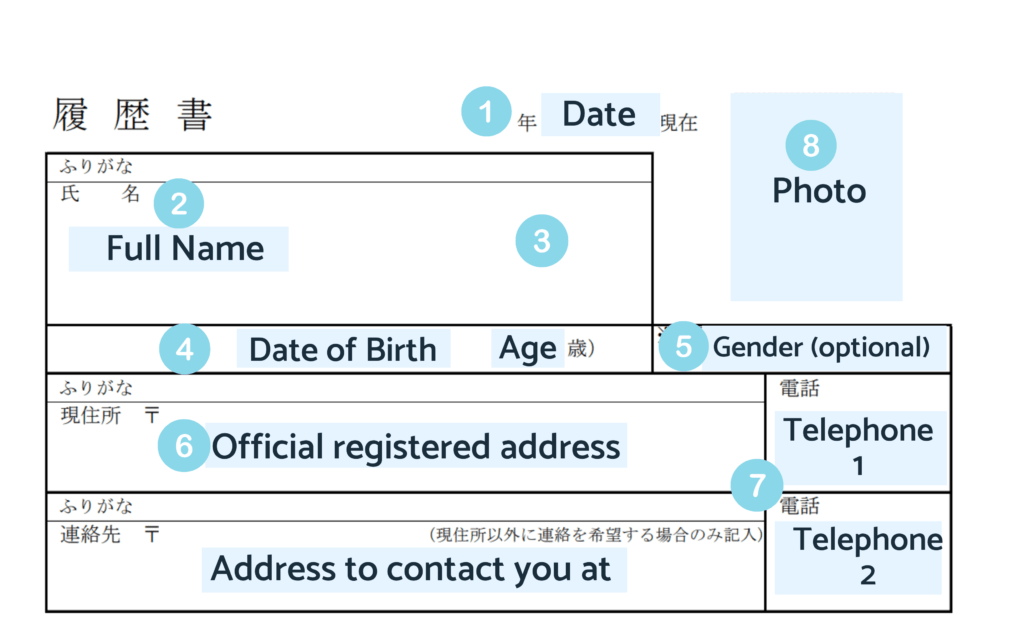
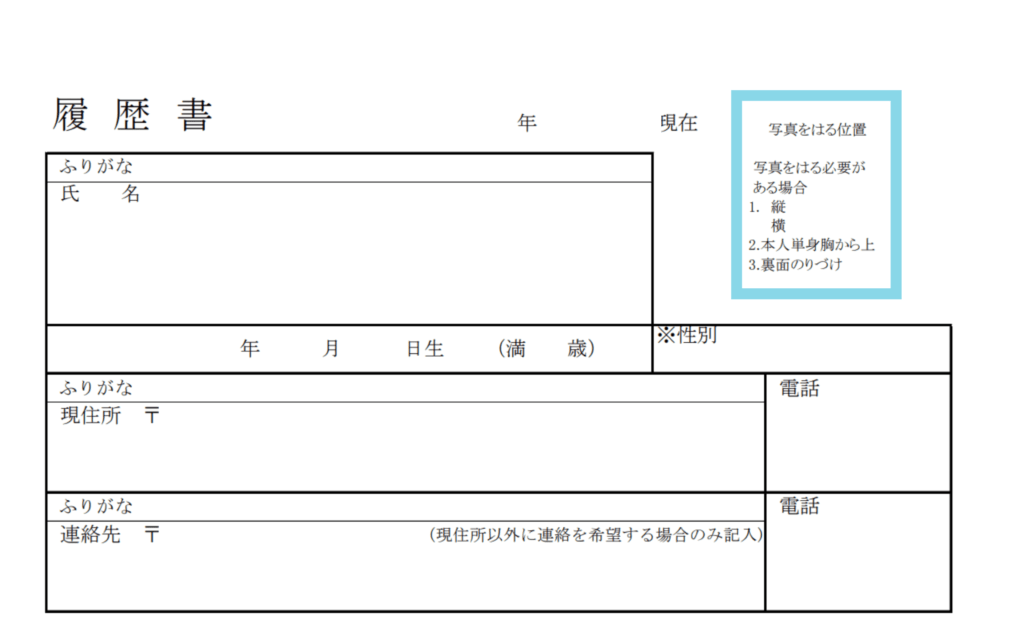
Overview of the Personal Information Fields on a Rirekisho
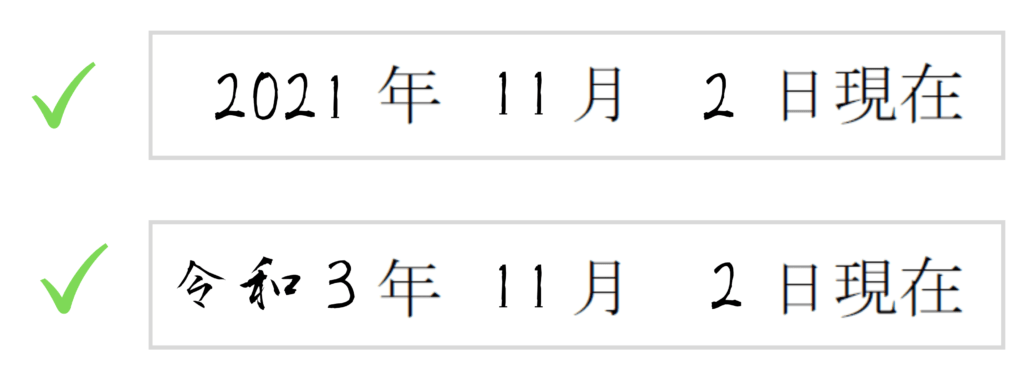
1. How to Write the Date
Use Japanese ordering
The date should be written in Year/Month/Date format, so take care if you are used to writing the date in another way.
Stick to one date format (Japanese or Western)
You can write the date using either western (ie. 2021) or Japanese formatting (ie. 令和3).
Neither is superior to the other (though some will argue that Japanese is better).
The most important thing is that you stick to your choice throughout the resume.
I.e. Don’t start the resume with Japanese formatting and then later suddenly start writing dates in Western formatting.
Use today’s date
When sending by post, the date should be the date you post the resume.
If you are bringing your resume directly to the interview, the date should be the date of the interview.
If you use excel or word to make your resume, you’ll need to remember to update the date every time you apply to a new job.
2. How to Write Your Name (氏名)
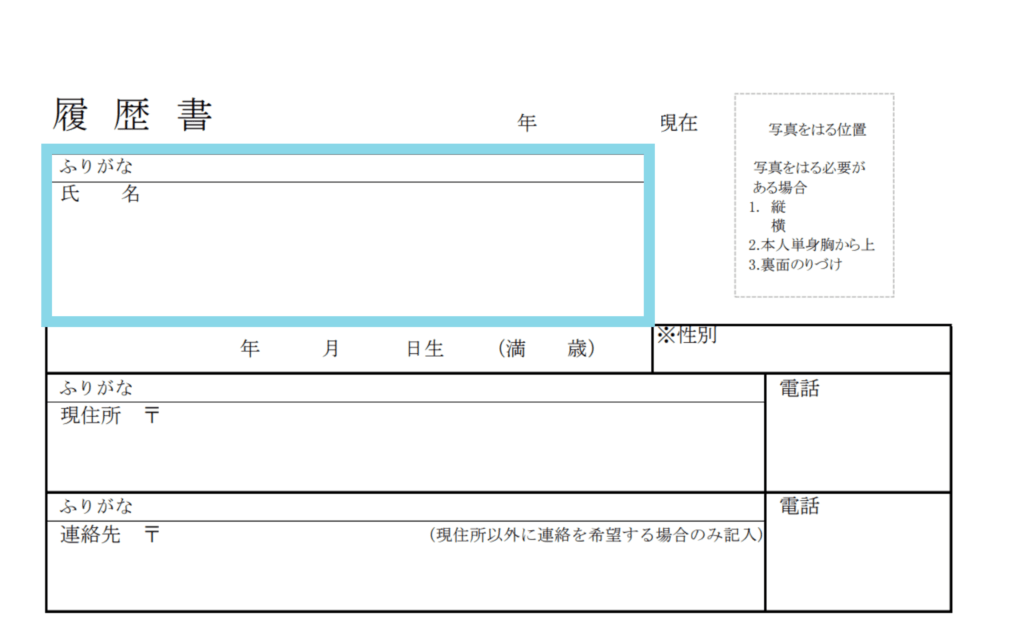
The name field includes a wide space to write your name, and a narrow field above to write the furigana (reading) of your name.
Write in clear block letters
Write your name in clear block letters, avoiding cursives. For foreigners, this is especially important, as Japanese recruiters may be unfamiliar with your name and any assumed spellings of it, leaving them unable to “guess” unknown letters.
Use Japanese name ordering
In the largest box, write your family name, followed by your first (and middle if applicable) name/s, with spaces between them as usual.
Use the correct furigana for your template
The narrow furigana field is where you write the reading of your name in either hiragana or katakana. Here, you will see some small text saying “furigana”.
If this text is written ふりがな, you should write the reading of your name in hiragana. If your template asks for フリガナ, use katakana.
3. Affixing a Personal Seal (optional)
While this is no longer an official requirement on Japanese resumes, you may see a space for affixing an inkan (personal seal) in the name field.
This will be indicated by the kanji ㊞ to the right of the name field, near the space where your photo goes. You should affix your inkan directly on top of this character.
Use a Shachihata Inkan and vermillion Ink
Japan has many kinds of inkan for all sorts of purposes. The type used for resumes is called a Shachihata inkan (朱肉). The ink color should be vermillion.
Check your inkan is aligned correctly
When affixing your inkan, make sure it is facing the correct way up, and that the ink is distributed evenly.
4. How to fill in Date of Birth / Age
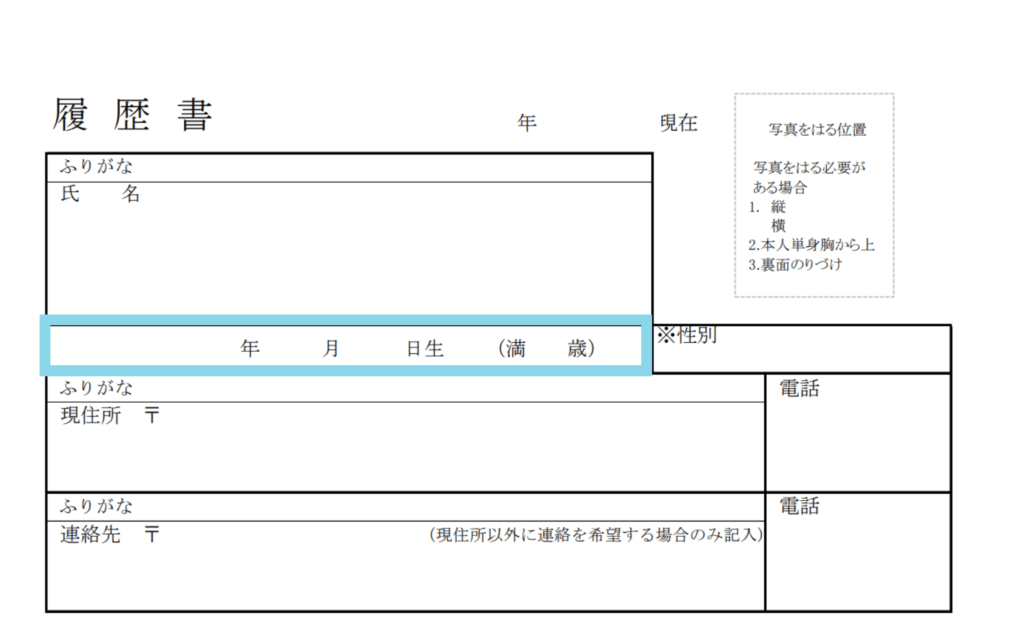
You will see this field below the name field. There are Year, Month and Date characters, with spaces between them for you to write your date of birth. In brackets, input your current age, at the time of sending the application.
Again, either Japanese or Western year format is fine, as long as your choice is consistent throughout the resume.
5. Stating Gender (optional)
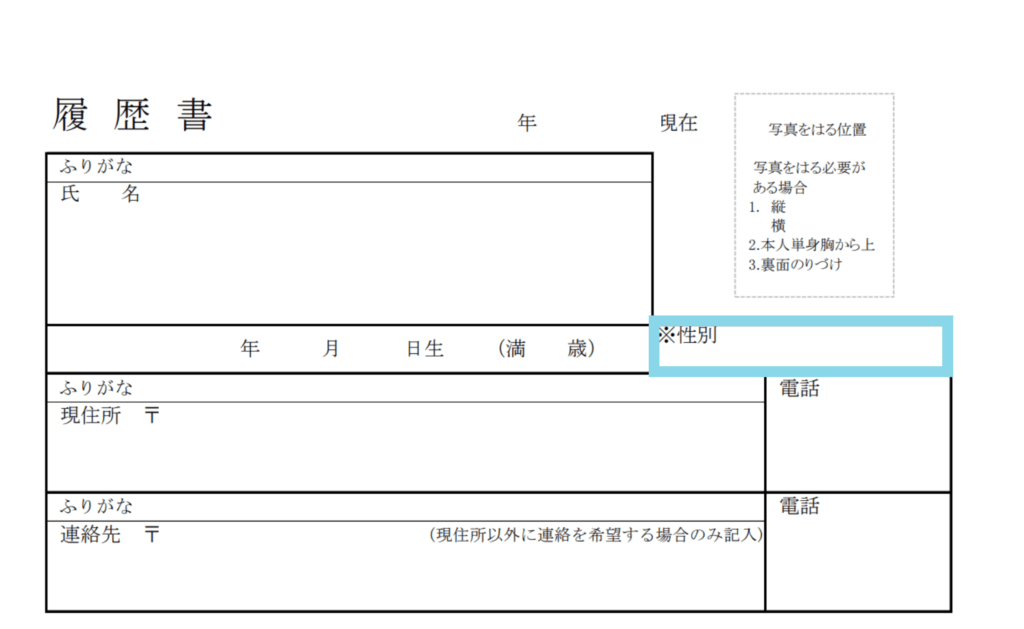
If the field is present, simply circle the kanji to indicate male (男) or female (女).
If you would rather not state a gender, you can use the government’s official template.
Due to concerns raised by the LGBTQ community, the gender field was made optional on the official rirekisho template provided on the Japanese government's homepage in 2020. However, some makers might still include the field. It's up to you whether you want to use a rirekisho with the gender field or not.
6. How to Write Your Address

There are two fields where you can write an address.
In the top field you should input the address you are officially registered at. In the bottom field, you can add an address you can be reached at should it differ.
Write the full address
For your address, make sure to write the address in full, including the prefecture.
In many cases, Japanese addresses are abbreviated to cut out words like ‘district ‘(丁目)and the name of the appartment. On a rirekisho however, make sure to write these in full.
For example, instead of 天神5-5-1-301 you should write 天神5丁目5-1ドリーム301
Use the correct furigana
Just as you did for your name, be sure to write the furigana reading of your full address in the narrow line above. Again, if the word “furigana” is in hiragana, you should write the reading of your name in hiragana, and likewise for katakana.
Roman alphabet words (such as apartment names) should also be given furigana.
Filling in Your Mail Address
This is an address you will use to correspond with the company, so make sure this is an address that you have easy and frequent access to. After submitting your resume to a company, keep an eye on your inbox, including your spam folder. (In the writer’s experience, Gmail is notorious for sending Japanese company mail to spam!)
* The government template used for illustration purposes on our blog does not include this field. Please use an alternative template if you wish to include your mail address. Alternatively, you can add it to the shokumukei-rekisho.
7. Filling in Your Phone Number
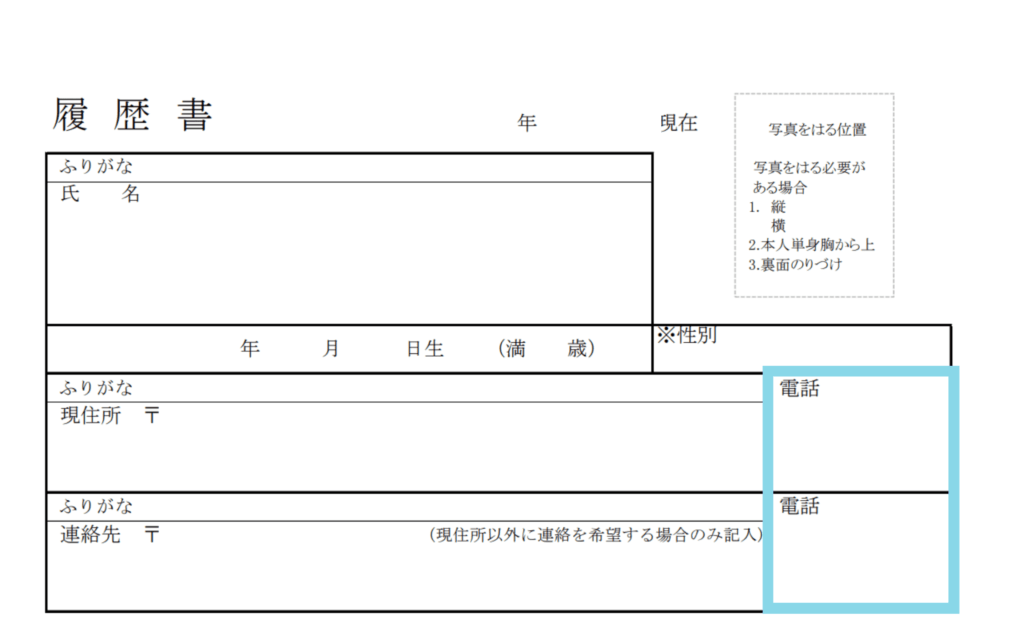
There are generally two spaces available for telephone numbers.
Most Japanese jobseekers will insert their landline telephone first, followed by their mobile.
As many non-Japanese (and people in general these days) might not have a landline number, it’s fine if you only put your mobile number.
The most important point here is that if an interviewer for a job calls you, you are able to answer!
8. Adding a Photo
The photo space for the resume is indicated by a rectangle at the top right.
There are many best practices for taking this picture, so take special note.
Dimensions should be 40mm x 30mm
As indicated on the rirekisho itself, photos should be 40mm x30mm in size. You can usually find the option for this, sometimes indicated by the word 履歴書 when you use a Japanese photo booth.

Where to take a picture
Although apps have come a long way, we still recommend using a Japanese photo booth to take your rirekisho photo, because of the superior lighting and clear background they offer.
Photobooths also have a lot of useful features and functions, such as sizing options, including one especially tailored for the Japanese rirekisho.
These days there are even some booths that offer beauty modes, or the option to change the background colors.
Some booths also have the added functionality of allowing you to send your picture to your smartphone via an app, so that you can print it again at a future date.
You can find Japanese photo booths at various locations across Japan – in subway stations, outside convenience stores, inside supermarkets and malls and on street corners.
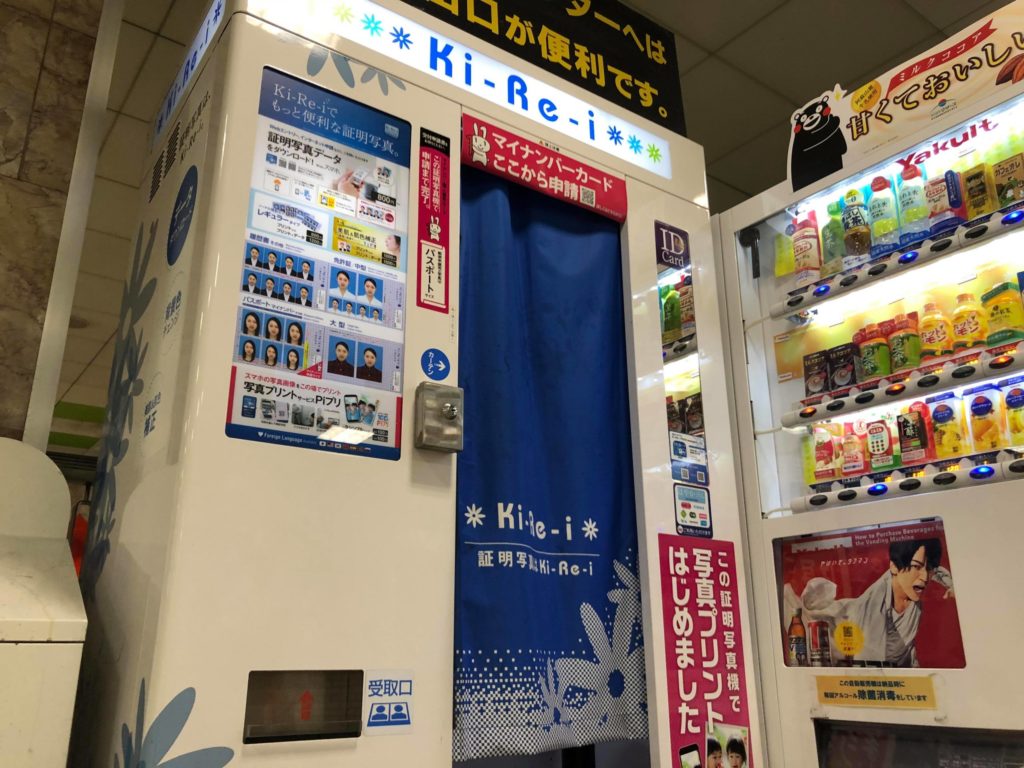
Using a Japanese photo booth
- Once you enter a booth, a voice will guide you with on screen prompts.
- Select your language
- Select the type of photo you want (4 x3)
- Insert payment (prices can vary from 500 – 1500 yen depending on the kind of photo you choose)
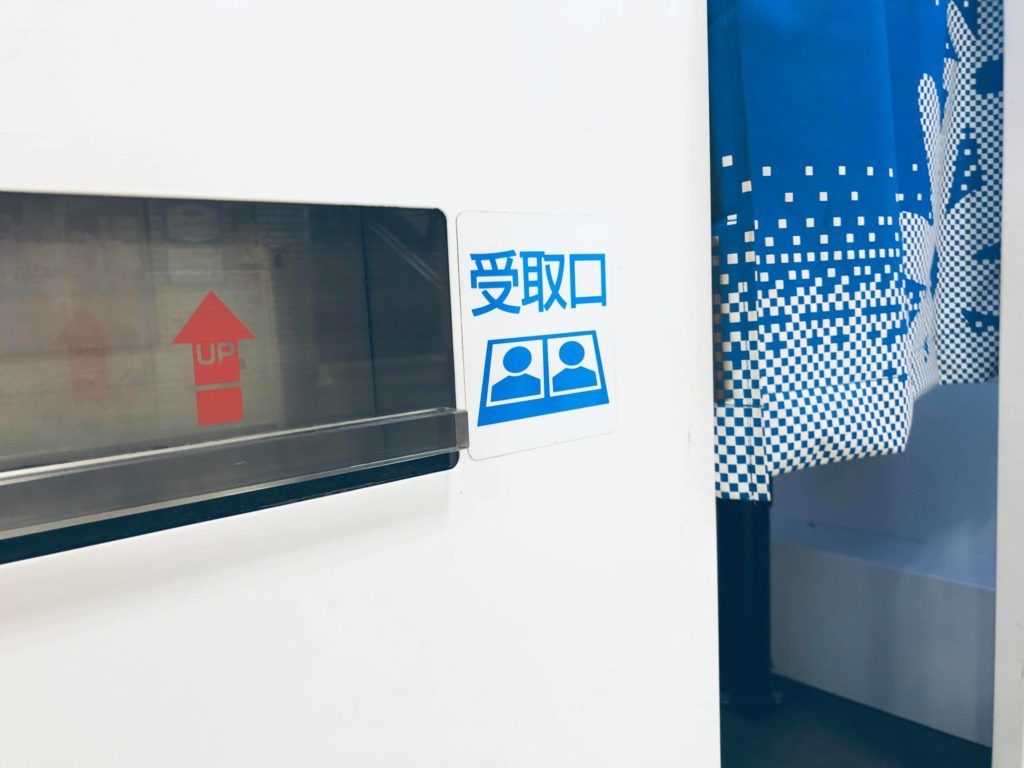
- The booth will instruct you to adjust your chair to the correct height, so that your body is in the center of the frame.
- The booth will let you take your picture around three times, finally letting you choose your preferred photo.
- Print /download the photo. (If there is an option to download your photo to an app, make sure to install the app before taking your photo)
What to wear
In the photo itself, it’s a good idea to dress formally. You should be facing forwards, with the upper half of your body (from the shoulders) in the picture.
Many Japanese recruiters recommend that long hair is kept tied back, and any stray strands of hair kept out of the face. Bangs / fringes should not obstruct the eyes.
For women: Women are allowed a little more leeway than men, but conservative attire, with understated accessories and makeup are safe choices.
For men: A white shirt, with a tie and suit jacket are recommended. Some recruiters might point out that a necktie allows you to show your personality a little, but an overly flashy design may be unwelcome depending on the company.
Try to consider what kind of company you are interviewing with when choosing your dress style. We do recommend, no matter how progressive a company might look on their website, to still err on the side of caution until you can make a proper assessment about a company’s attitudes to dress.

How to pose
While smiling is not forbidden, most people will wear a neutral expression for the photo, with the corners of their mouths upturned just slightly.
How to arrange and fix the photo to your resume
You’ll need some scissors and paper glue. If your photo was printed as part of a set at a photobooth, cleanly and carefully cut one picture out. The picture should be able to fit neatly into the photograph placeholder. Finally, affix the photo using an even amount of paper glue.
Writing your name and date of birth on the back of your picture before affixing it can be useful in identifying it if it becomes unstuck at the company’s end!
The requirement of the photo is sometimes a culture shock for western job applicants, who may come from places where photos on resumes are illegal (although conversely, LinkedIn has managed to reframe the idea of using a photo in a positive way). In Japan too in recent years, the necessity of the photo field has come under scrutiny, thanks to an increasing awareness of “unconscious bias”. Some companies in Japan have thus changed their own company policies, telling applicants not to include a photo. However, it is for the most part still an expected requirement for most Japanese companies.
We hope these tips will help you in getting your rirekisho off on the right foot!
In our next blog in this series, we will show you how to complete the second section of the rirekisho – the Education and Work History section.